Documentation
Wiring, ECU setup, the touch controls and Gauge Studio, start to finish. For ordering and warranty questions, see Support.
On this page
Quick start
- Check your ECU. It must send data on CAN. Haltech, MaxxECU, ECUMaster EMU Black and rusEFI/uaEFI have built-in profiles; Link is experimental; anything else works with your own CAN values. See compatibility.
- Turn on its CAN stream in the ECU's software (ECU setup), at the bus's bit rate.
- Fit and wire the gauge: switched 12 V, ground, CAN high and low, and the optional dimmer (Wiring).
- Design it in Gauge Studio: pick the ECU, a look and your pages. Studio keeps your work in the browser and saves
.k24gfiles. - Set your warning limits. Studio's starting limits are placeholders, not your engine's figures.
- Send it to the gauge over USB-C or a USB-CAN adapter, with the car parked (Send to gauge).
Wiring
The included harness carries five wires; pin 6 is unused. Use the pin numbers moulded on the connector. Run CAN high and low as a twisted pair, away from ignition leads.
| Pin | Wire | Connect to | Notes |
|---|---|---|---|
| 1 | 12 V switched | An ignition-switched, fused supply | Not a permanent 12 V feed: the gauge should be off with the key. |
| 2 | Ground | The same ground point as the ECU | A shared ground avoids CAN errors and flicker. |
| 3 | CAN high | The ECU's CAN high | Where a dash or keypad would connect. |
| 4 | CAN low | The ECU's CAN low | Twisted with CAN high. |
| 5 | Dimmer (optional) | The parking-light circuit | Switches the gauge to its night brightness and night colours. |
Bus termination
A CAN bus needs a terminator at each end, and only at the ends. The gauge has one built in, switched on or off in software: turn it on only if the gauge is the last device on the bus, and leave it off if the gauge joins the bus partway along. With several gauges, only the one at the end has it on. Set it under Bus terminator on Studio's Settings step; it is part of that gauge's setup, so send each gauge its own. At each start the gauge comes up silent on the bus, sets its terminator as saved, and only then starts listening, so it never switches the terminator while it is talking on the bus. It is off until you turn it on, and after a reset until the gauge has started.
ECU setup
The gauge only listens: it never writes to the ECU unless you turn on the touch keypad. Turn on the ECU's stream, then pick the same ECU on Studio's ECU step, which repeats these steps and lists the readings the gauge will get.
Haltech Elite and Nexus
Connect the gauge to the Haltech CAN bus, where a Haltech dash or keypad would go. Elite and Nexus ECUs send their broadcast at 1 Mbit/s; in NSP, check that the bus runs at 1 Mbit/s.
MaxxECU
In MTune, open the CAN bus settings and turn on MaxxECU default CAN output. The bus runs at 500 kbit/s. Oil pressure and temperature need MaxxECU firmware 1.135 or later.
ECUMaster EMU Black
In the EMU Black client, open the CAN-Bus setup. Turn on the EMU Black CAN stream with base ID 0x600, and set the CAN speed to 1 Mbit/s.
rusEFI and uaEFI
- In TunerStudio, open the CAN settings.
- Set Enable rusEFI CAN broadcast to yes.
- Leave the base address at 512 and the address type at 11 bit.
- Set the CAN bit rate to 500 kbps.
- Burn, then switch the ignition off and on.
Link G4X and G5 (experimental)
- In PCLink, open ECU Controls, then CAN Setup.
- On a free CAN module, set a channel to Transmit Generic Dash at ID 1000.
- Set that CAN module to 1 Mbit/s, and store to the ECU.
This profile hasn't been checked against a real Link yet. Tell us how it goes.
MoTeC, AEM, Emtron and others
Pick Other ECU and enter the values your ECU sends, or import a DBC file. See Other ECUs.
On the gauge
| Do this | And the gauge |
|---|---|
| Swipe left or right, or drag round the rim | Goes to the next or previous page. Dots show which page you're on. |
| Tap | Shows the lowest and highest since key-on for a few seconds. During a warning, a tap acknowledges it. |
| Hold until the ring fills | Opens the page's settings. Locked while the car is moving. |
| Drag round the rim while editing | Turns the value up or down, like a dial. |
What it shows when data is missing
The gauge never shows an old number as if it were live. A reading that stops arriving shows a dash and STALE; one that has never arrived shows a dash and NO DATA.
Warnings
Past a limit you set, the reading turns amber (caution) or red (warning) everywhere it shows, and the gauge can take over the screen. Tap to acknowledge: the warning shrinks to a reminder and comes back if the reading gets worse. A red warning can't be dismissed for good while it's active.
Brightness
With the dimmer wire live (parking lights on), the gauge drops to its night brightness and night colours. Parked, it dims after the time you set in Studio's Settings; moving, a touch or a warning brings it back.
Gauge Studio
Gauge Studio is the gauge's own software running in your browser: the face you see is drawn by the same code as the gauge, so what you build is what you get. Open Studio on this site, or full screen at /studio/app. It works in Chrome, Edge and Firefox; sending a setup needs Chrome or Edge.
The screen
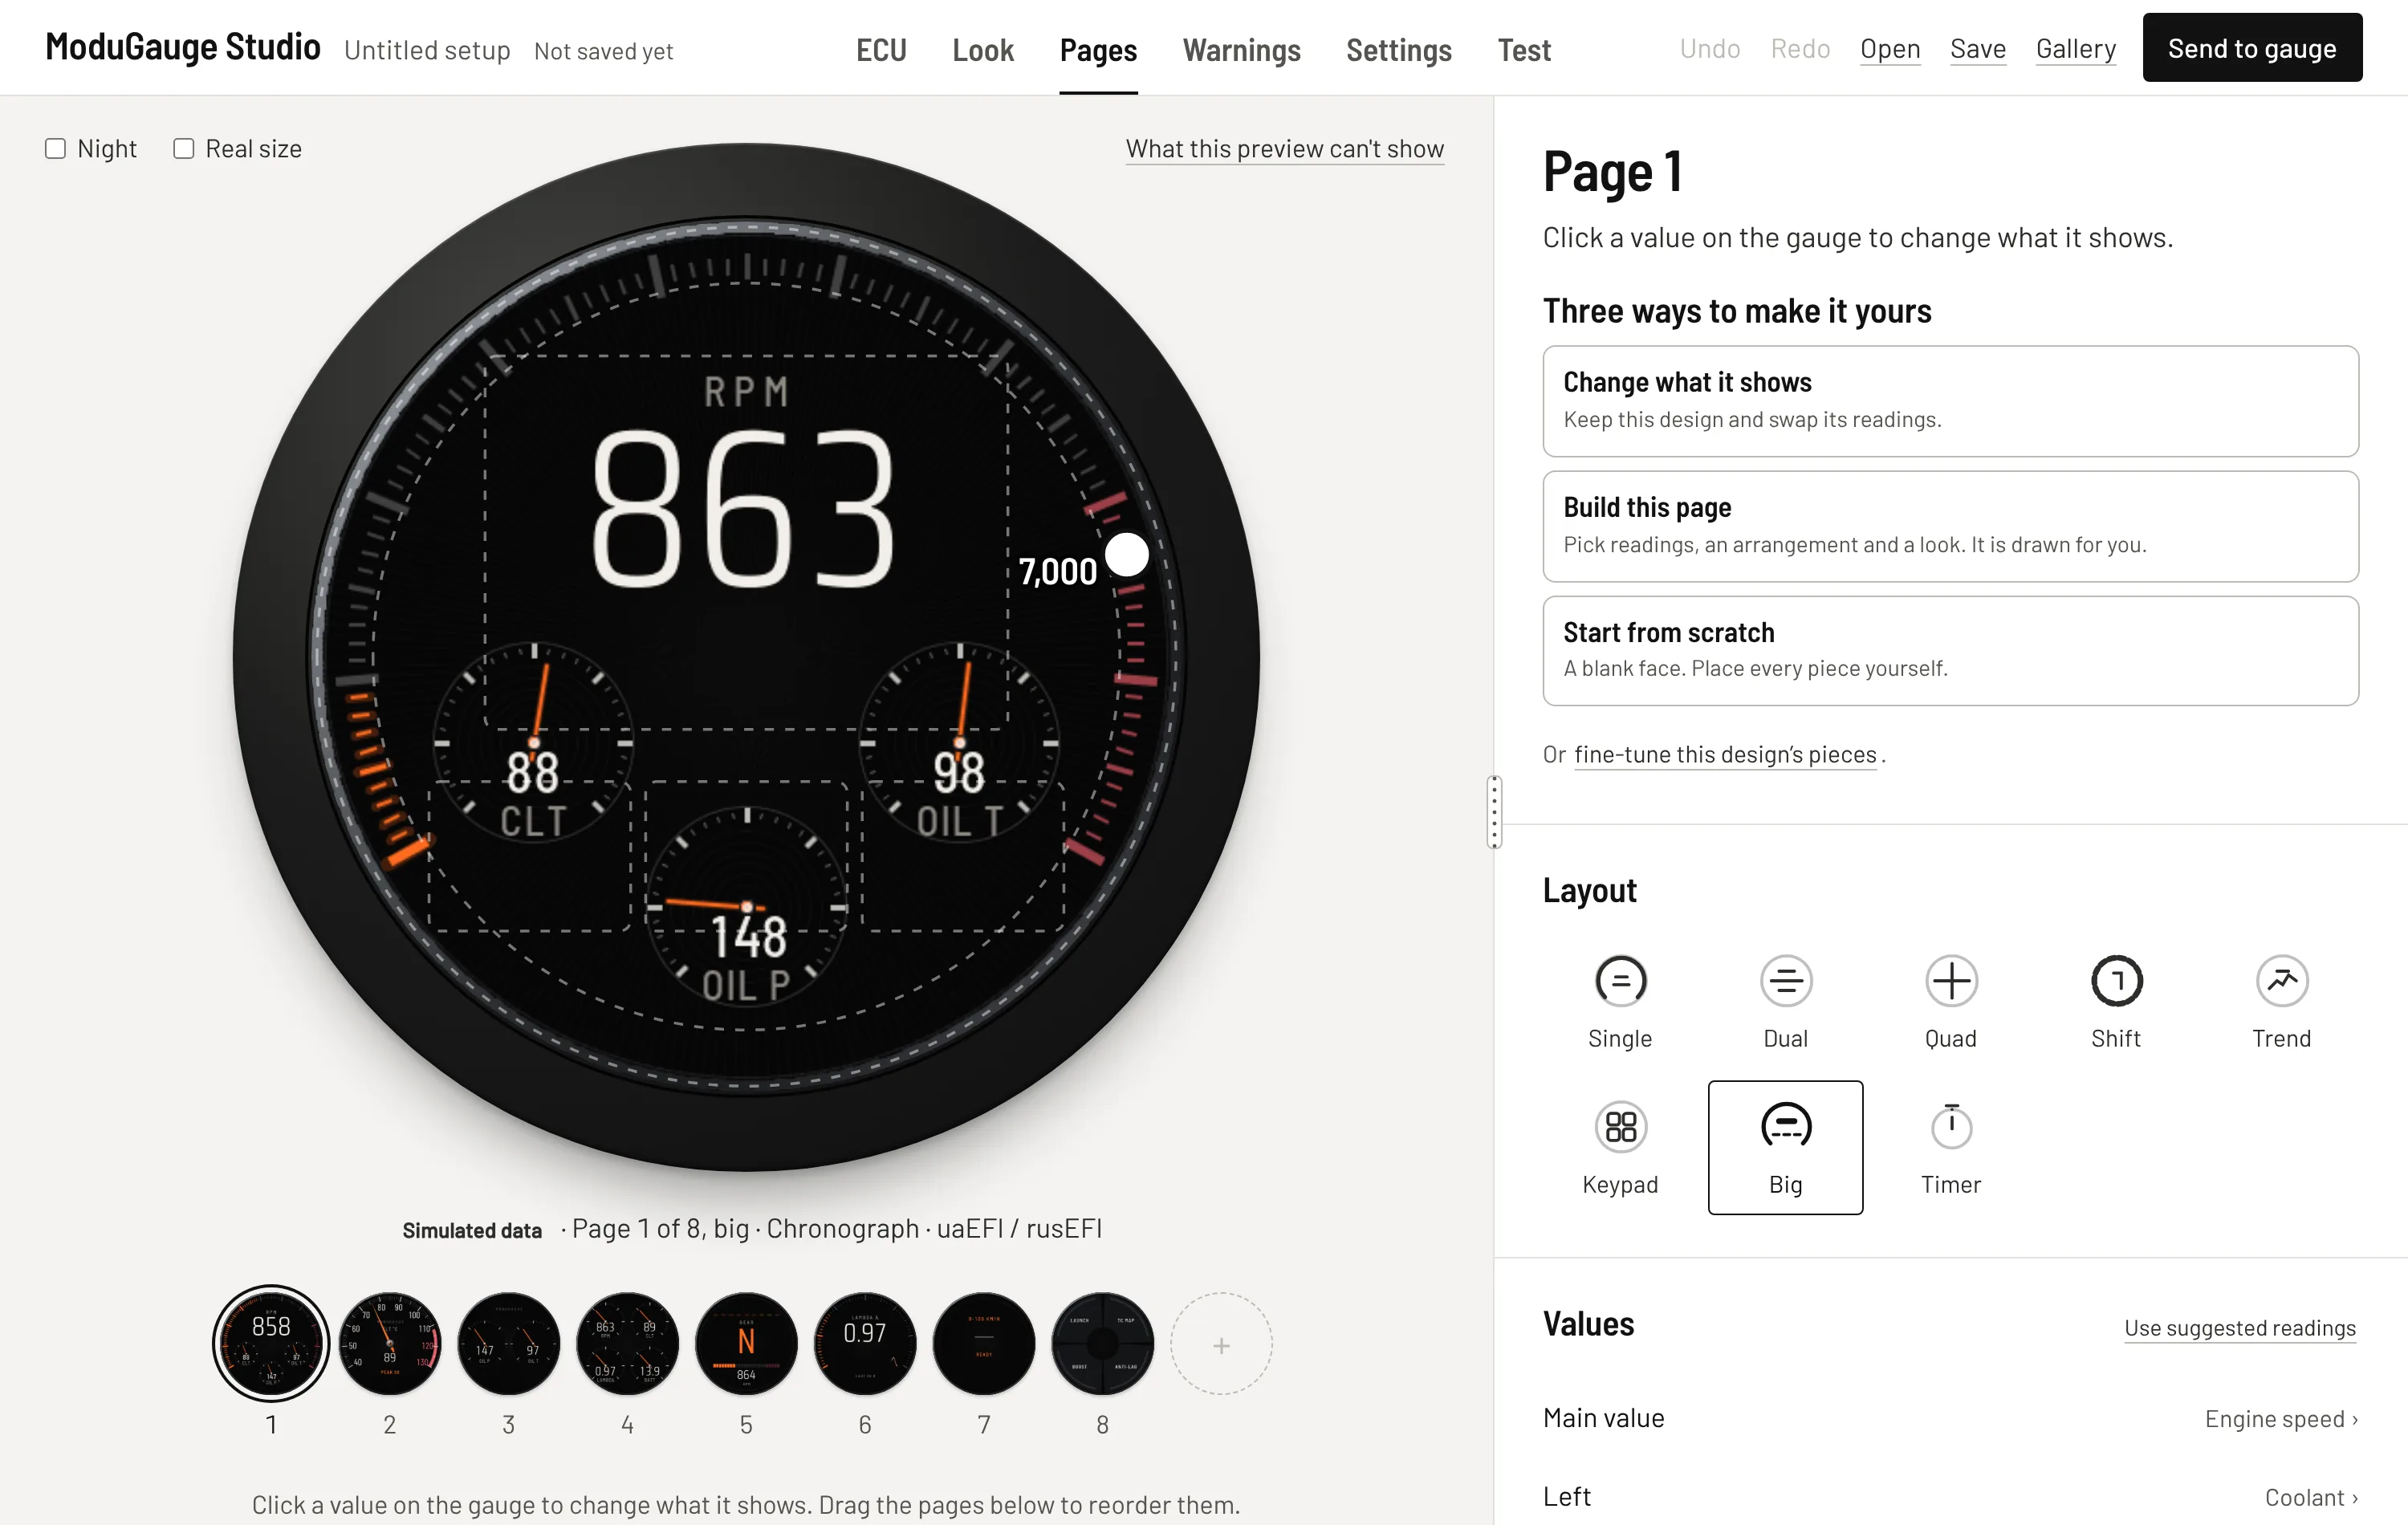
- Steps along the top: ECU, Look, Pages, Warnings, Settings and Test. Each changes the right-hand column, never the gauge.
- Undo and Redo (Ctrl+Z, Ctrl+Shift+Z) cover every change, including edits made on the emulated gauge.
- Open and Save read and write
.k24gsetup files. Your work is also kept in the browser. - Gallery shares your design to the design gallery, or loads one from it.
- Night shows the parking-light colours; Real size shows the face at its true size after a one-time check against a bank card.
- Click or tap the gauge to touch it, as in the car. Space plays or pauses the demo drive.
| Key | Does |
|---|---|
| E L P T | ECU, Look, Pages and Test steps |
| Space | Play or pause the demo drive |
| Ctrl+Z, Ctrl+Shift+Z | Undo, redo |
| Arrow keys | Nudge the selected piece on your own page |
Look
Pick a look to start from, then make it yours: an accent colour, a colour theme, a background photo, the typeface and every colour of the face. Its look and its pages replaces your pages with the look's; Its look only keeps your pages. Undo brings them back either way. You can add up to four of your own fonts (TrueType or OpenType) and set separate night colours.
Pages
The gauge holds up to eight pages. Drag the thumbnails to reorder them; the + adds one. For each page:
- Layout: single, dual, quad, shift, trend, big, timer or keypad.
- Readings: click a value on the gauge to choose what it shows. Readings your ECU doesn't send are marked.
- Scale: each reading has one range and number of decimals, used on every page. Units (°C or °F, kPa, bar or psi, km/h or mph, lambda or AFR) are set once for the whole gauge.
- Shift point: drag the handle on the rev ring or type it, and choose whether the ring or the whole face flashes.
- States: preview the page at night, under a warning, stale and with no data.
Your own page
The Pages step offers three ways to make a page yours: Change what it shows keeps the design and swaps its readings; Build this page draws one from readings, an arrangement and a look; Start from scratch gives a blank face. Fine-tune this design's pieces turns any page into pieces you can move, size and recolour. On your own page you can add:
- Compose a face (Build a face tab): say what matters, pick an arrangement and a look, and a finished face is built with your readings.
- Ready-made gauges: pick a reading, where it goes (whole face, top half, small left...) and a gauge (needle dial, LED ring, arc, band dial...). It arrives as one group you can move or resize at once.
- Add pieces one at a time: needles, arcs, tick tracks, scale numbers, LED and dot rings, bars, values, text, icons, warning lamps, gear, shift lights, history, pictures, panels and circles. A page holds up to 40 pieces.
Click a piece on the gauge to select it (click again where pieces overlap to reach the one underneath). Drag it to move it; drag its white square to size it. Its settings are in tabs: Look, Reading, Colours, Warnings and Position. Shift-click picks several pieces together.
A dial from a photo uses a picture of a real dial as the background: click its centre and its lowest and highest marks, and a live needle points at its printed numbers.
Scales and numbers
Tick tracks, LED rings, dot rings and bars have a Numbers choice on their Look tab: at the long marks, at long and half marks, or at every mark. Studio shows what the numbers will read before you look at the gauge.
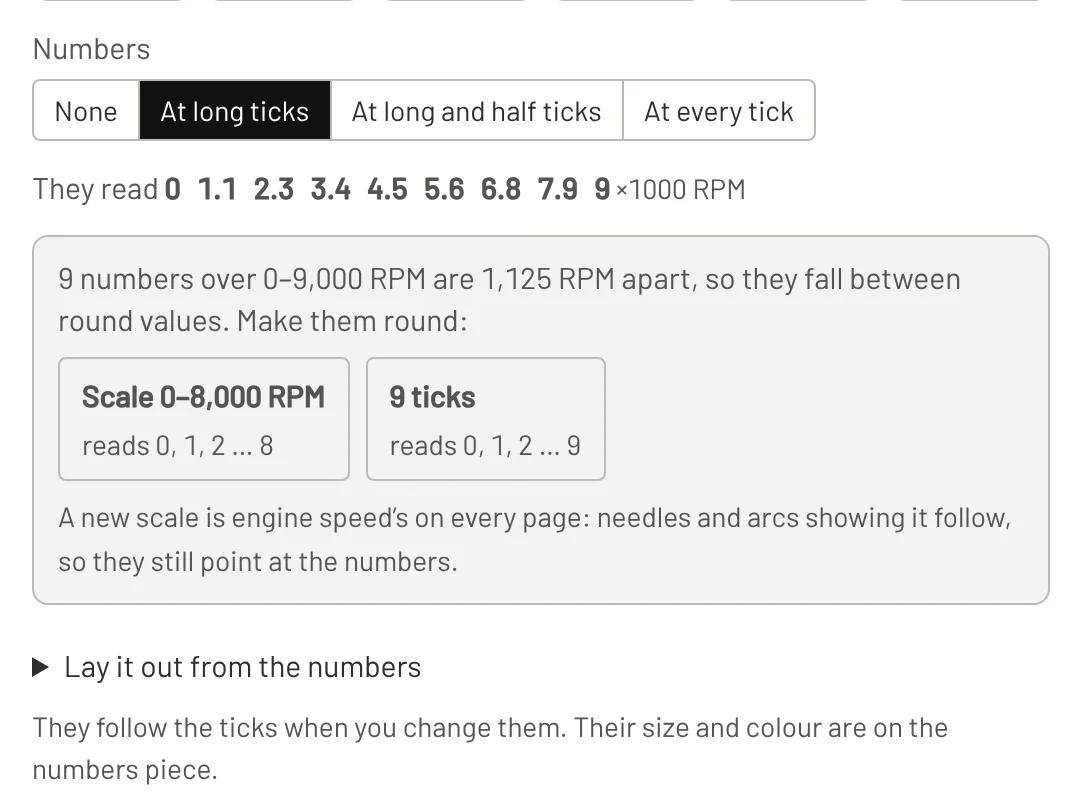
Numbers are the reading's values at each mark, so they're round only when the marks split its range into round steps. Eight ticks over 0–9,000 rpm are 1,125 rpm apart and read 0, 1.1, 2.3 and so on. Studio offers both fixes:
- Change the range, keeping your eight ticks: 0–8,000 rpm reads 0, 1, 2 … 8. The range belongs to the reading, so every needle and arc showing it follows and still points at the right number.
- Change the count, keeping the range: nine ticks read 0, 1, 2 … 9.
Or work from the numbers: open Lay it out from the numbers and choose a number every 1,000 rpm with quarters between, for example. Studio only offers steps whose numbers fit without touching. Engine speed's numbers are in thousands; other readings show in full. Scale numbers have their own size, typeface and colour on the numbers piece, and Your own labels prints words instead (E,,F or C,,H).
Warnings
Set a safe range for any reading, whether or not it's on a page: above or below a limit, amber or red, with a margin that stops flicker. Oil pressure can be watched only while the engine runs. There's room for 32 limits. The warning screen and its reminder can be restyled under How a warning looks.
Studio's starting limits are placeholders (coolant 105 and 112 °C, oil pressure under 100 kPa, battery under 11.8 V). Set yours from your engine builder's figures.
Settings
- Start-up screen: a small line over a name, such as your car's, with Play it to preview.
- Start-up sweep: none, a slow rise, or a fast sweep up and back.
- When parked: how long before it dims once stopped, and how long before the screen turns off when no data arrives at all.
- Bus terminator: on only if this gauge sits at a physical end of the CAN bus; see bus termination. Shared designs leave it out, and opening one keeps yours.
Test
A demo drive feeds every reading, encoded in your ECU's own CAN format, so the gauge shows exactly what that ECU can send. Try a situation (a warning, no data, the ECU disconnected) or take over any single reading: set its value, make it stale, or cut it off. Speed over 5 km/h locks editing on the gauge, as it does in the car.
Send to gauge
- Check. Studio checks the setup is valid and fits the gauge, and reminds you if the warning limits are still placeholders.
- Connect. Plug the gauge into the computer with a USB-C cable, or plug a USB-CAN adapter (slcan: CANable, CANtact, USBtin) into the car's CAN bus with the ignition on and the car parked. Pick the bus's bit rate. Chrome or Edge asks which port to use.
- Choose the gauge. Find gauges lists every gauge on the bus; Which one? makes that gauge show THIS GAUGE.
- Send. Studio sends the setup, the gauge checks it, and Studio reads it back and compares. An interrupted send changes nothing. Load its setup reads a gauge's setup into Studio instead.
Practise on the emulator runs the same steps against the gauge on the page, no hardware needed. A gauge refuses setup while the car is moving. Setup from your phone over the gauge's own Wi-Fi is planned.
Other ECUs
Pick Other ECU on the ECU step and enter each value the way your ECU's CAN document gives it:
- CAN ID in hexadecimal; tick 29-bit ID for extended IDs (J1939, AEM).
- Where in the frame: whole bytes, or a start bit and length as in a DBC file; Intel or Motorola order; signed or unsigned.
- Scaling in the ECU's own unit (kPa or psi, gauge or absolute, °F, K, AFR, mph...). Studio converts it.
- Check it with a frame from the demo drive or bytes from your own capture: Studio shows the result, a bit map of the frame, and warns about overlapping values.
Import a DBC file offers every signal with a guess at the matching reading; Copy from a built-in ECU starts from a known profile. Four extra channels can carry readings the gauge doesn't name, such as wastegate duty or boost target.
Several gauges
Run as many as you like: each listens to the same CAN bus and keeps its own pages and look. Send each its setup separately, using Which one? to tell them apart. Only the gauge at the end of the bus has its terminator on. By default, red warnings show on every gauge.
Touch keypad
A Keypad page turns the face into up to four touch buttons that the ECU sees as a CAN keypad: Haltech (2×4 or 3×5, keypad A or B) or a CANopen keypad. What each button does (launch, traction map, pit limiter) is set up in the ECU, exactly as for a real keypad, and the ECU's light colours show along each key's edge. It's off by default; with it off, the gauge sends nothing. Keys work while moving; editing stays locked. Keypad support hasn't been tested against a real ECU yet.
Troubleshooting
Every reading shows NO DATA
The gauge isn't hearing the ECU. Check that the ECU's stream is on, the bit rate on Studio's ECU step matches the bus, CAN high and low aren't swapped, and the bus is terminated at both ends (about 60 Ω between CAN high and low with the power off).
One reading shows NO DATA
Your ECU may not send it. Studio's ECU step lists what each profile carries, and marks the readings yours doesn't send. With your own CAN values, check its CAN ID and position.
A reading shows STALE
It arrived, then stopped. Look for a loose CAN connection or a stream that's turned off partway. With your own CAN values, the timeout may be shorter than the ECU's send rate.
The numbers are wrong (too big, negative, or jumping)
Usually scaling or byte order. In Studio, open the value under Other ECU and use Check it with a captured frame. Swap Intel and Motorola order, check signed or unsigned, and enter the unit the ECU sends.
A warning won't clear
A warning clears once the reading is back inside its limit by its margin. Tap to acknowledge it meanwhile. Check the limit in Studio's Warnings: the starting limits are placeholders.
Studio can't find the adapter or the gauge
Use Chrome or Edge (Firefox can't open serial ports). Close any other program using the port, such as the ECU's tuning software, and try another USB cable: some only charge. On a CAN adapter, the bit rate must match the bus.
The scale numbers aren't round
Select the tick track, LED ring, dot ring or bar and use the suggested fix under Numbers. See Scales and numbers.
Studio looks different from last time
Studio updates with the gauge's software. Your setup is kept in the browser, and saved .k24g files from older versions still open. If something looks wrong, reload the page.
Still stuck? Email [email protected] with your car, your ECU and your saved .k24g file.